In this article, we are going to learn how to calibrate extruder steps of your printer. Calibrating extruder steps is one of the crucial steps to getting a good 3D print out of your printer.
what are extruder steps?
Stepper motors use “steps” in order to know the shaft’s position angle at a given time, it will also count the number of steps to know how much or in which direction it moved. In the image below, you can see a motor with a 1.8° step angle. It needs 200 steps to do a single rotation of the shaft of the motor. Since almost all the 3D printers in the world use stepper motors to push filament in the extruder, we need to provide accurate data to the main board (3D printer controller) about the correct number of steps it needs to push a certain length of filament to the hot-end.

Why calibrate extruder steps?
If you notice the following signs, you might have to re-calibrate the E-steps of your 3D printer.
- Inconsistent Extrusion: If you see that your prints are either over-extruding or under-extruding, it is most likely due to having the wrong E-step value. If you’re seeing uneven layer height (One layer is thicker or thinner than the other) is also a sign that your E-steps values are wrong.
- Layer Misalignment: If you notice that layers are misaligned and have poor surface quality. And you’re sure all the other settings are correct, this might be due to a wrong E-step value.
- Inaccurate Print Dimensions: If your print dimensions are off by some amount, this could also be a sign of wrong E-step values.
Note: If you change the extruder that came with your 3D printer, You will most likely (unless they have the same diameter gears) have to re-calibrate E-Steps. Since the gear diameters of every extruder aren’t the same, even if you had the E-Steps dialed in for the old extruder you had in your printer, it would not work for the new one. If the new Extruder has bigger gears than the old extruder it will push a longer length of filament to the hot-end when you rotate it same number of steps. which will result in over-extrusion.
How to Identify wrong E-step values
Bowden Extruder
It’s relatively easy to test if you have correct E-steps in a Bowden extruder compared to a direct drive extruder. In order to make sure nothing else is affecting the test results, it’s better if you can remove the end of the Bowden tube from the extruder’s side. There’s usually a clip put in place to lock it, you can remove it and pull the bowden tube out.
After you pull the Bowden tube out, you can insert some filament into the extruder and push it out till it comes out of the extruder. (length doesn’t matter we just need to make sure it isn’t stuck between the gears.
After it pops out of the extruder we have to cut it flush with the extruder, Then we go to the menu of the printer where you can manually move each axis.
Select the extruder (E1) and move it 10cm or (100mm). After the extruder is done moving, you can measure the length of the filament which is extruded out of the extruder.
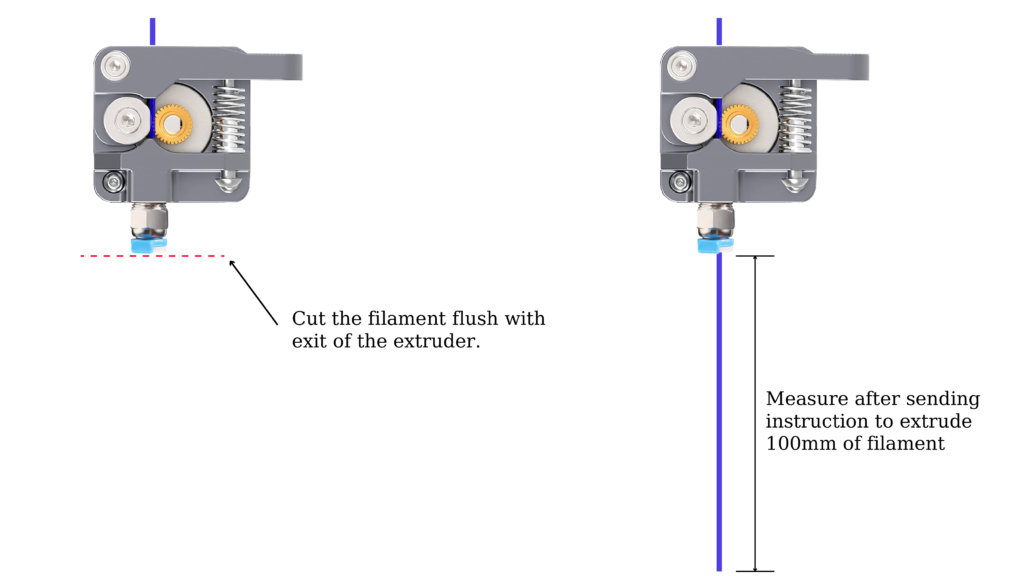
If it is longer than 100mm, then your extruder is over-extruding.
if it’s less than 100mm it’s under-extruding.
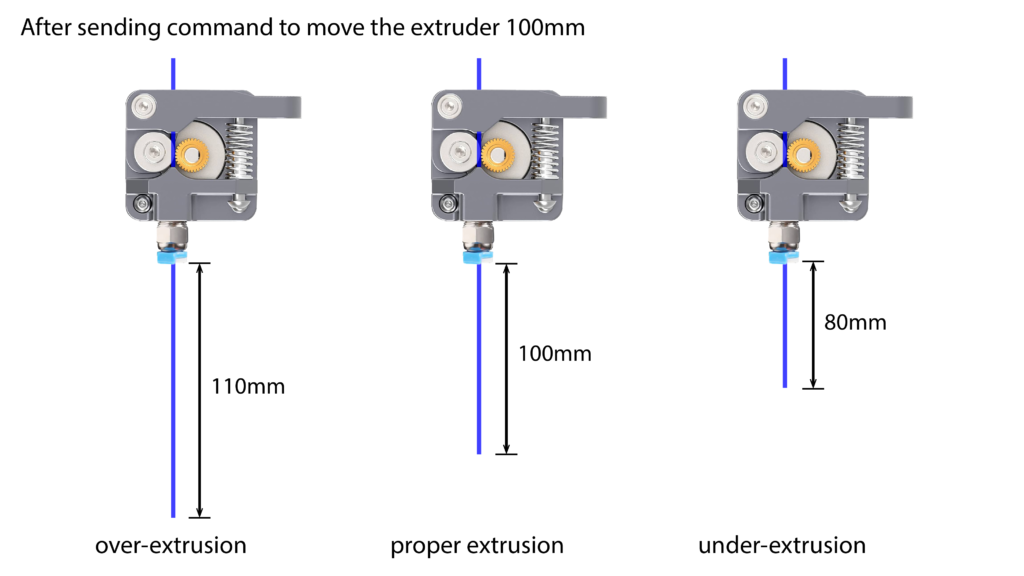
The image on the left shows over-extrusion, the extruder will try to push more filament (more than 10 cm of filament) than the controller expects it to. Because the E-steps are not calibrated properly.
The image in the middle shows well-calibrated E-steps. This means the extruder will push 10cm’s of filament when the controller expects it to push 10cm’s of filament.
The image on the right shows under-extrusion, The extruder will not push enough filament to the hot end. The extruder is pushing less than 10 cm of filament when the controller expects it to push 10 cm.
How to calibrate the E-step values
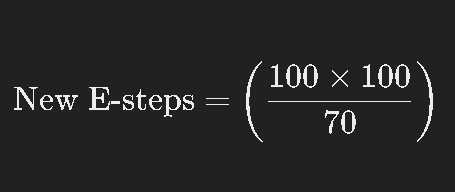
If you did the test, and see that your extruder is either over-extruding or under-extruding, you should consider calibrating the E-steps of your printer. Finding the correct E-step value is very easy using this formula.

If you measure the length of the filament that is extruded after you cut it flush and send the command to extrude 100mm, you can apply that measurement to this formula and get the correct E-step value for your extruder.
Say you measured 70mm of filament, then the calculation is,

For direct-drive extruders
The process for direct drive extruders is very similar. the main difference is that, with a direct drive extruder, the extruder is mounted directly on top of the hot-end. If you can remove the extruder from the hot-end, you can follow the same steps as with a Bowden extruder.
If you are unable to remove the extruder from the hot-end, you can measure from the top of the extruder (entry) instead of measuring from the exit of the extruder.
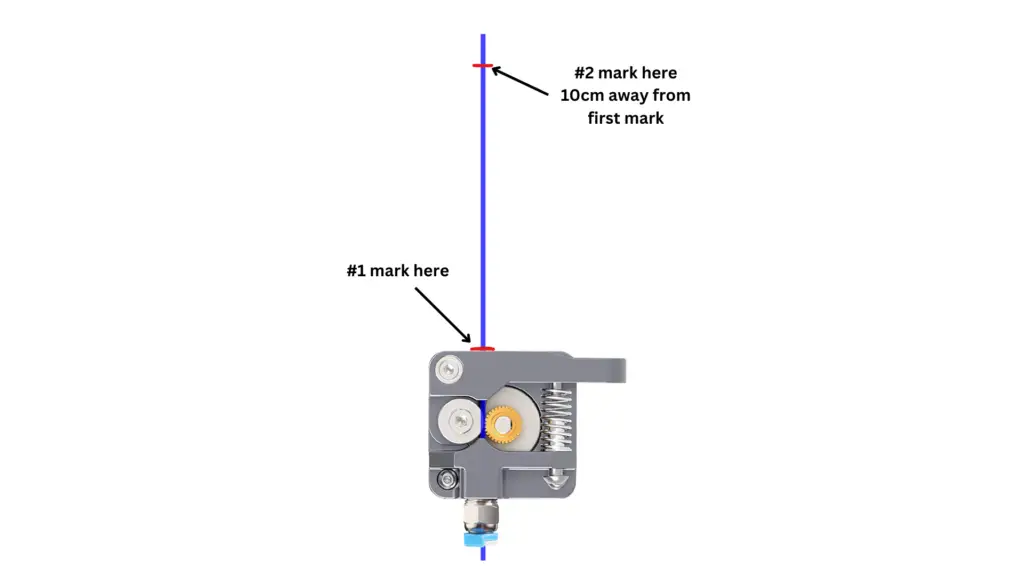
you can mark 100 mm and see if you’re not reaching the mark (under-extrusion), stopping right on the mark (proper amount of extrusion), or going past it (over-extrusion)

FAQ
How do I prevent over-extrusion?
Extruder calibration. The main culprit for over-extrusion is an uncalibrated extruder. You can easily fix this by calibrating the extruder.
E steps calibration formula
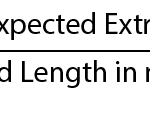
New Steps/mm = Current Steps/mm×Expected Extrusion Length in mm / Actual Extruded Length in mm
when to calibrate the 3D printer extruder?
After Upgrading or Replacing the Extruder.
Immediately after assembling and setting up the printer.
After Significant Printer Modifications (Hotend, Nozzle size, or changing to a Direct drive from a Bowden Extruder)
When changing filaments with different characteristics.
Periodic Maintenance
If you are experiencing inconsistent Extrusion

One Response