Table of Contents
Introduction
What is 3D printing
3D printing is a type of additive manufacturing method. In contrast to conventional manufacturing techniques like milling, 3D printing creates parts without removing material from a workpiece. Layering materials is the fundamental idea of additive manufacturing. Until we have the desired part, we print layer after layer. Considering that no material is wasted, this is incredibly efficient. The material used for brims and supports is the only material that is wasted. This pales in comparison to the waste generated by conventional production methods. The ability to create shapes that are impossible to construct using conventional production methods is an additional benefit.
Getting Started with 3D Printing
Applications of 3D printing for hobbyists
- Custom Designs: Design and print unique objects like custom phone cases, custom enclosures jewelry, or figurines.
- Rapid Prototyping: Create physical prototypes quickly to test designs and concepts.
- Cosplay Props: Print props and accessories for costumes.
- Model Making: Print models for various hobbies like miniature figures, vehicles, or buildings.
- Personalized Gifts: Print custom gifts like keychains, ornaments, or name tags.
- Replacement Parts: Print replacement parts for broken household items like toys, tools, or appliance components.
Types of 3D printers
FDM (Fused Deposition Modeling): Extrudes molten plastic layer by layer to build the object.
SLA (Stereolithography): Uses a laser to cure liquid resin layer by layer.
SLS (Selective Laser Sintering): Uses a laser to sinter powdered material layer by layer.
Choosing the right 3D printer for your needs
| Technology | Description | Advantages | Disadvantages |
| FDM | Fused Deposition Modeling: Extrudes molten plastic layer by layer to build the object. | Affordable, versatile, wide range of materials, good for prototyping. | Lower resolution, visible layer lines, can be less precise. |
| SLA | Stereolithography: Uses a laser to cure liquid resin layer by layer. | High resolution, smooth surface finish, great for detailed models and prototypes. | Requires post-processing, can be more expensive, limited material options. |
| SLS | Selective Laser Sintering: Uses a laser to sinter powdered material layer by layer. | High strength, durable parts, no need for support structures, good for complex geometries. | Higher cost, limited material options, and post-processing required. |
Things you will need to get started
- Essential Equipment
- 3D printer (Chose a budget printer that suits your needs and budget)
- Filament (Some popular choices are PLA and PETG for more strength)
- Software
- 3D Modeling Software (If you plan on designing your own models). There are many free and paid options. The software with goo
- Slicing Software (essential for turning your 3d models into G-Code, Cura, and PrusaSlicer are popular choices).
- Additional Tools (Optional but Helpful)
- 3D Model Files (If you aren’t yet familiar with modeling software you can go to thingiverse.com to find free 3D models.
- Calibration Tools (Pliers, Tweezers, Wire cutters, fallen wrenches, screwdrivers, sandpaper, Digital Caliper)
- Cleaning Supplies (IPO, Brushes, Tissue)
- Safety gear (Eye protection, Gloves)
Setting Up Your 3D Printer
Since each printer is different, Please refer to the manufacturer’s instructions during this step. You can look up a guide on YouTube for your printer model. You will have to level your print bed before starting a print. You can click on the hyperlink above to watch some YouTube videos on how to do that. You can load the filament to the print during this step. Before printing you have to make sure that you have the correct Z offset and a properly leveled bed. Otherwise, there’s a chance that your hotend crashing into the heat bed.
3D Printing Process
Slicing the 3D model
To print a 3D model, first you have to slice the model into hundreds or if not thousands of layers. to do this we use a software called a slicer. You have many options but the most popular ones are Cura, PrusaSlicer, and Orca Slicer. You can download a 3D model from thingiverse.com or another website, In this case, I just need the 3D model for the benchy, I don’t need to download the accessories. So click on the 3D benchy.stl file to download it.
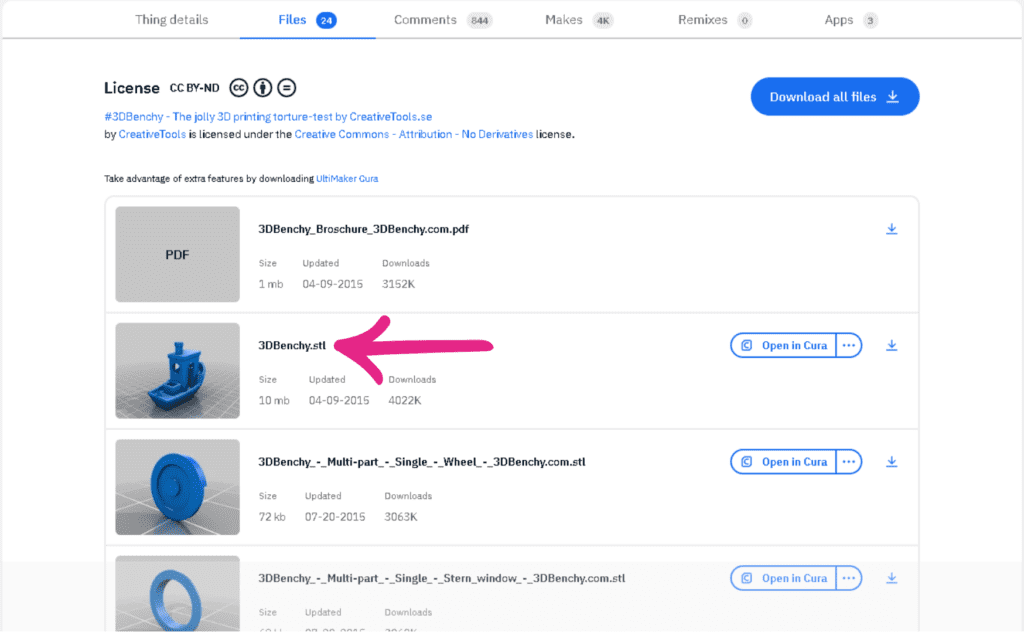
files that have the “.stl” extension in the end are the 3D models. You can use your preferred slicer software to open these files to turn them into G-Code.
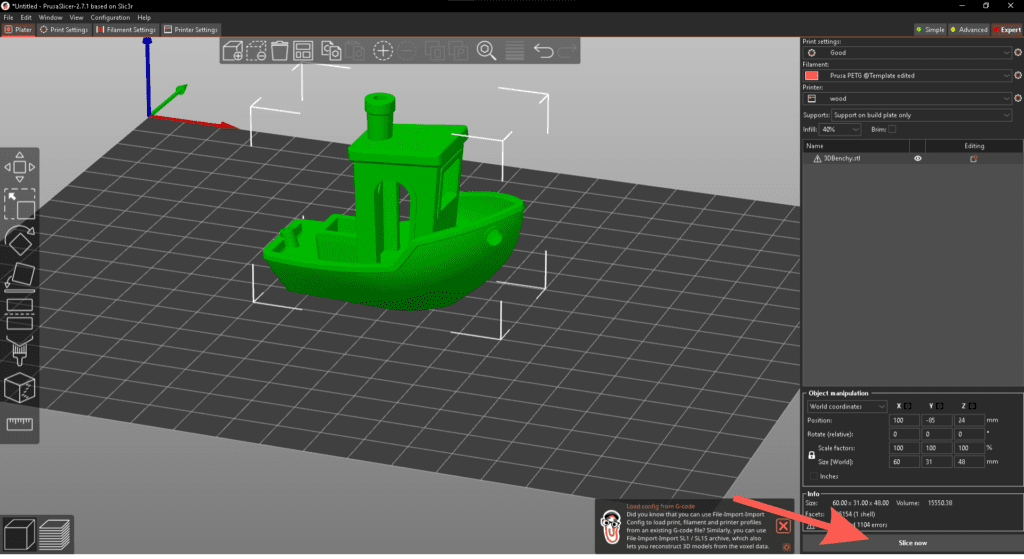
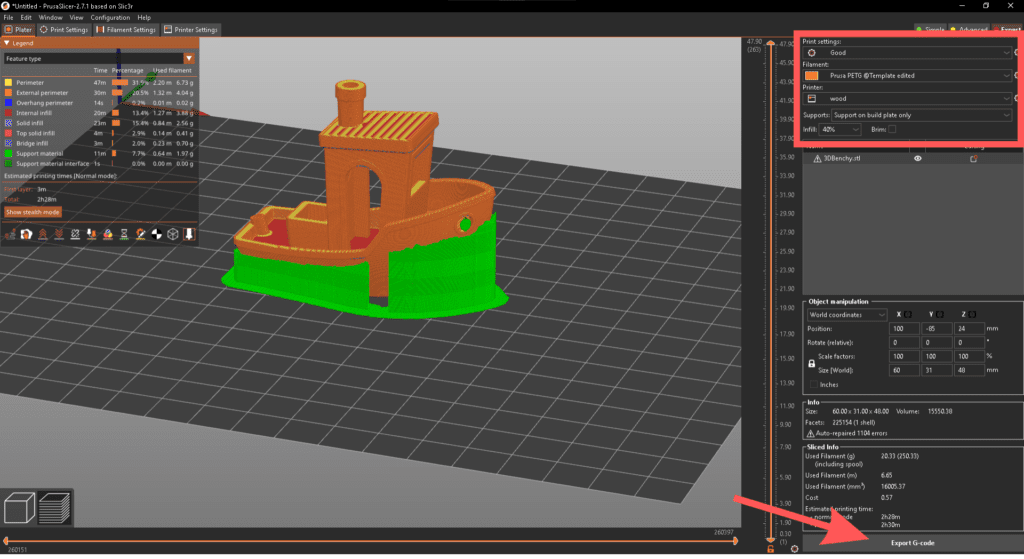
After opening the 3D model using the slicer software, you can change many settings like Layer height, filament temperature, and type, Infill density, Infill type, supports, etc. I am using PrusaSlicer here for demonstration purposes but most of these settings and user interfaces are the same for all the slicer software.
If you can find a preset for your exact printer in the slicer software, things will be much easier to set up. Otherwise, it will be a somewhat trial and error process. You can find printer presets in forums and other communities. A printer preset in a slicer program is a collection of settings that are optimized for a specific 3D printer and material combination. These settings include things like,
- Printer settings
- Print bed size and shape
- Nozzle diameter
- Maximum print speed
- Acceleration
- Filament settings
- Temperature
- Flow rate
- Retraction settings
- Print settings
- Layer height
- Infill density
- Wall thickness
- Support structure settings
- Print speed
- Cooling fan speed
As you can see there are many things included in a printer preset. Dialing in each of these from scratch is very time-consuming. so finding a preset makes things straightforward.
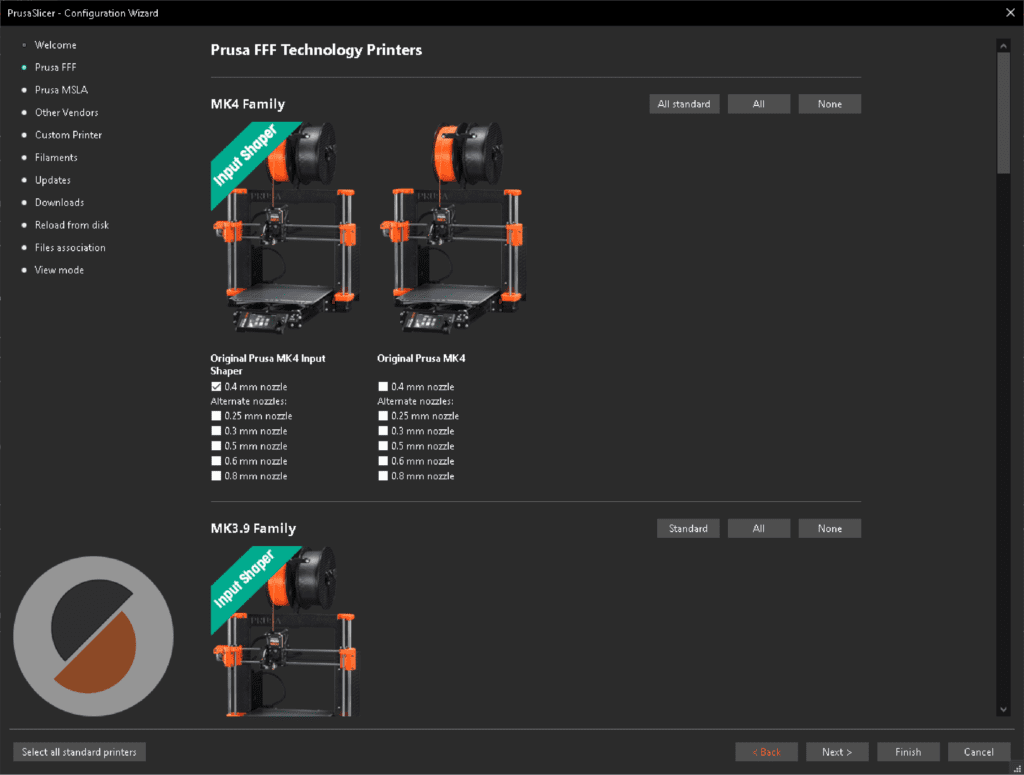
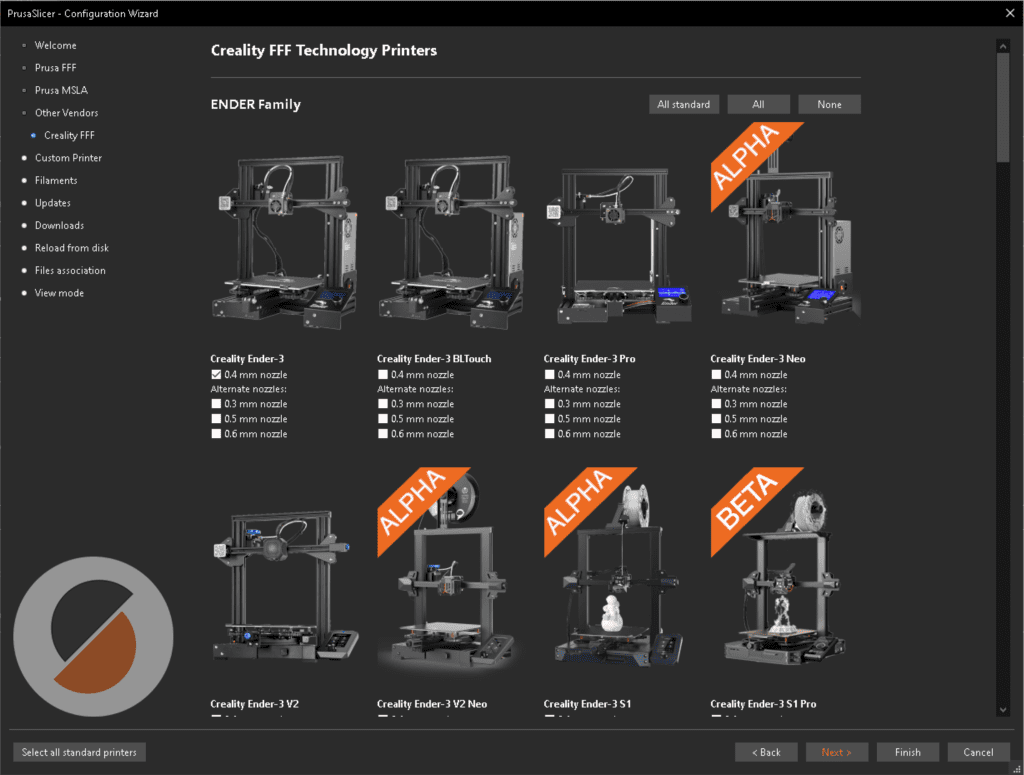
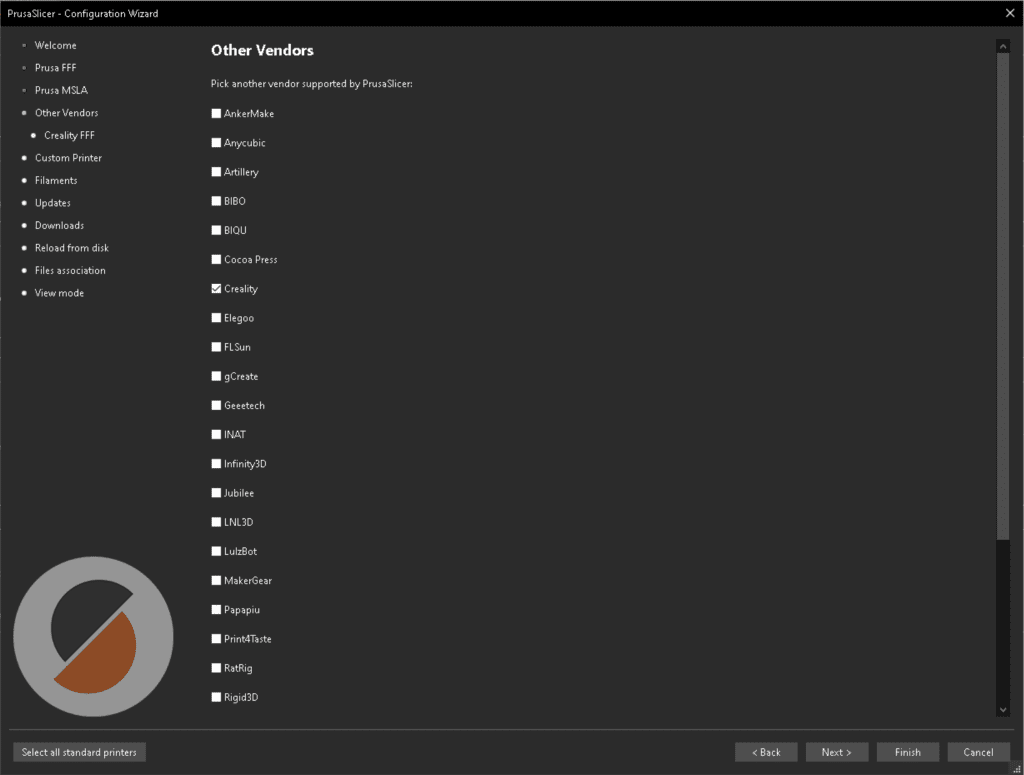
This is the Prusa slicer configuration wizard. Configs for some popular brands and models exist here. There are also configs for SLA printers from other brands, not just for FDM printers. You can configure your printer as a custom printer through this wizard as well, though it is highly not recommended. Configuring your printer preset requires a lot of expertise. If you are a beginner this is not recommended. you can accidentally turn off safety overrides harming you or change settings that will destroy the printer. So if you can find a preset made by the printer manufacturer or a user this will help you a lot.
Sending the sliced model/ G-Code to the 3D printer
There are a few ways to send the sliced file (commonly called “G-Code”) to the 3D printer. Some advantages and disadvantages of each one are listed in the table below. Depending on your printer model some of the advanced methods like OctoPrint, Wi-Fi, or Cloud Printing may not be available for your printer. In that case, you will have to use the common ways like Using the SD card/USB slot or by using USB cable.
| Method | How It Works | Benefits | Limitations | Best For |
| SD Card or USB Drive | Save the G-code file to an SD card or USB drive and insert it directly into the printer. | Reliability: Not affected by network issues. Portability: Easy transfer between devices. | Limited File Management: Locating files on card can be cumbersome. Wear and Tear on the port. | Users who prioritize simplicity and reliability. |
| Direct USB Connection | Connect your printer to a computer via USB and use control software (e.g., Pronterface, Repetier-Host). | Full Control: Real-time settings and monitoring. Advanced Features: Adjust temp, speed, etc. | Limited File Management: Locating files on the card can be cumbersome. Wear and Tear on the port. | Users who want direct, hands-on control. |
| OctoPrint with Raspberry Pi | Connect the printer to a Raspberry Pi running OctoPrint for remote control via Wi-Fi. | Remote Monitoring: Control and view progress remotely. Plugin Support: Adds extra features like time-lapse, alerts. | Setup Complexity: Requires technical knowledge. Connectivity Issues with weak Wi-Fi. | Tech-savvy users who want extra features and remote access. |
| Wi-Fi or Cloud Printing | Use the printer’s built-in Wi-Fi or Ethernet to send files from computer or app. | Convenience: Send files over the network. Slicer Integration: Directly send files from slicing software. | Network Dependency: Interruptions may stop the print. Security: Potential vulnerabilities online. | Users who value quick, network-based transfers. |
| Bluetooth (Less Common) | Send G-code files wirelessly to printers with Bluetooth support. | Wireless without Wi-Fi: Suitable for setups without Wi-Fi. | Range and Speed: Limited for large files or long prints. Compatibility: Few printers support it. | Remote workshops or users without Wi-Fi setups. |
| Cloud Printing Platforms | Upload G-code to cloud platforms (e.g., AstroPrint, Polar Cloud) for remote management and monitoring. | Ultimate Convenience: Manage and monitor prints remotely. File Management: Organize designs in the cloud. | Subscription Fees for some platforms. Privacy/Security concerns for sensitive designs. | Use the printer’s built-in Wi-Fi or Ethernet to send files from a computer or app. |
It doesn’t matter which way use to send the first model to your printer, seeing the printer come to life after pressing the print button is truly mesmerizing. I was so fascinated with the movements of the printer. I knew right then that I was hooked since I stood there an hour watching a whole benchy print.
Even though seeing your printer move for the first time is fun. It’s also stressful. If your bed leveling or z offset is wrong there’s a chance for the hotend to crash into the heat bed. Be prepared to turn off the printer if it crashes.
If your prints go well but you are not satisfied with the results, here’s an article about common 3D printer problems that you can check out to make your prints awesome. This article goes over the most common 3D printer problems and how to fix them.
With all that said that was a quick and easy guide to get you started with your brand new 3D printer. Good luck and happy printing!
FAQ
Can a beginner use a 3D printer?
Yes, Modern 3D printers are mostly plug-and-play. 3D printers have come a long way since they first came into the market. Even a newbie can buy a 3D printer and get started after looking up some guides and tutorials.
Does a 3D printer use a lot of electricity?
A 3D printer uses 50-60W worth of electricity per hour of use. Almost the same wattage as the average incandescent light bulb. If you are not familiar with wattages, 60wattes is very little.
What materials can be used for 3D printing
PLA (Polylactic Acid)
ABS (Acrylonitrile Butadiene Styrene)
PETG (Polyethylene Terephthalate Glycol)
TPU (Thermoplastic Polyurethane)
Nylon
Polycarbonate (PC)
PVA (Polyvinyl Alcohol)
Carbon Fiber and Glass Fiber Composites
Resins (for SLA and DLP printing)
