3D Printing has revolutionized the modern world. It was a niche subject when it just came up but now, it’s being used in many industries and hobbies. Even though it’s become very popular and common, sometimes it’s challenging even for an enthusiast to get stuck on a problem and get frustrated 😂.
But don’t worry, most of these problems have simple and straightforward fixes. In this article, we will discuss the Top 10 Most Common 3D Printing Problems and How to Fix Them. By the end of this article, you will be printing the perfect benchy.
Table of Contents
3D printing troubleshooting
Poor bed adhesion
Problem:
The prints do not stick to the print bed, causing the print to warp or fail.
How to fix it:
- Level the bed.
- Use adhesives.
- Adjust bed temperature.
- Calibrate the Z axis.
Level the bed
A perfectly leveled bed is essential to get the first layer to properly adhere to the bed. If your bed is not leveled correctly, the print will most likely detach from the bed mid-print. At that point, there’s not much of a choice but to start over with a new print after leveling the bed.
Since different printer models come with different features, it’s kind of impossible to give you a one-and-done method that will work on all printers. However, the principle of leveling a bed is the same for almost all cartesian printers. We have to make sure that the distance between the nozzle tip and the print bed is the same at each corner of the print bed.
Note: even though we are measuring the gap between the nozzle and the bed, we are using that measurement to make sure the bed is level with the nozzle. If your print starts in mid-air after you press print. You are very likely experiencing a Z offset issue.
Most if not all the printers in the market will have 4 knobs at each corner for this purpose. Since there are a lot of 3D printer models in the market, I suggest looking up a leveling guide for your 3D printer model on YouTube if your bed is not leveled properly.
https://help.prusa3d.com/article/bed-level-correction_2267
Calibrating the Z-axis
If your prints start mid-air after you press print, your Z-axis offset is not calibrated properly. The Z-axis offset must be changed if you change your print bed or add a build plate (PEI sheet).
When we add a thicker print bed or a PEI sheet on top of our existing bed, the thickness of the print bed changes. If we don’t account for this increase in the slicer or our firmware, the nozzle will collide with the Print bed/ PEI sheet. We will have to subtract the thickness of the sheet we added from the current Z offset to avoid collision.
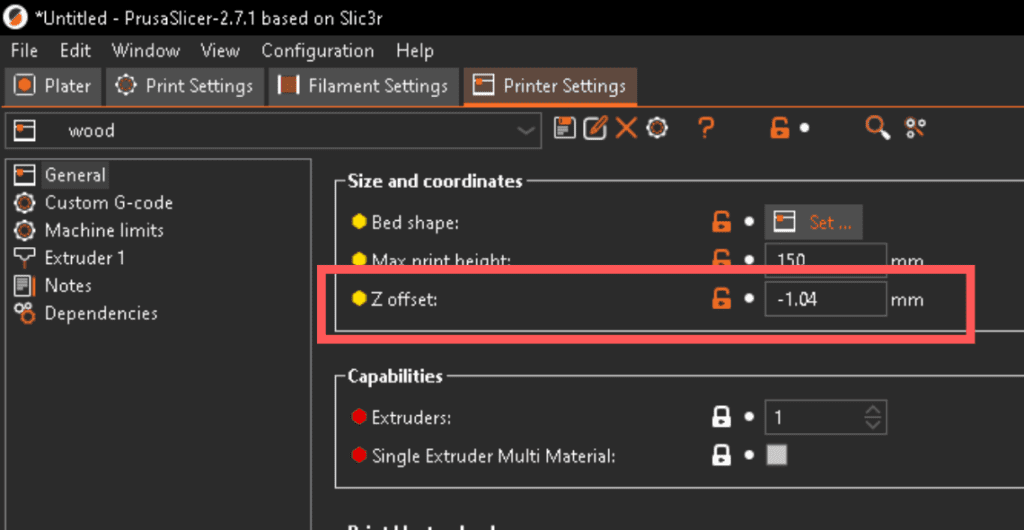
Conversely, if we install a thinner print bed or remove the PEI sheet, we have to add the thickness of the PEI sheet to the current Z offset to avoid collision.
Use adhesives
If your first layer looks consistent (same thickness) but your prints keep unsticking from the bed, the reason for this is your bed level is probably well calibrated, but the prints are failing due to just lack of bed adhesion,
When this happens, you can either
- Use adhesives like glue sticks, hair spray, or specialized 3d printing adhesive on the bed.
- Use painter’s tape to cover the print bed.
Adjust bed temperature
If your printer has a heated bed, you can increase the first layer adhesion by adjusting the heat bed temperature. But if you are using the wrong temperature for the filament you’re printing with, the adhesion will be poorer than it’s supposed to be. To rectify this you can look up the correct temperature for the filament you’re printing with and adjust the bed temperature.

Stringing or Oozing
Problem:
Thin strings of filament are left behind on your print, ruining the surface quality.
How to fix it:
- Increase Retraction Distance
- Optimize Retraction Speed
- Lower Printing Temperature
Increase Retraction Distance and Speed
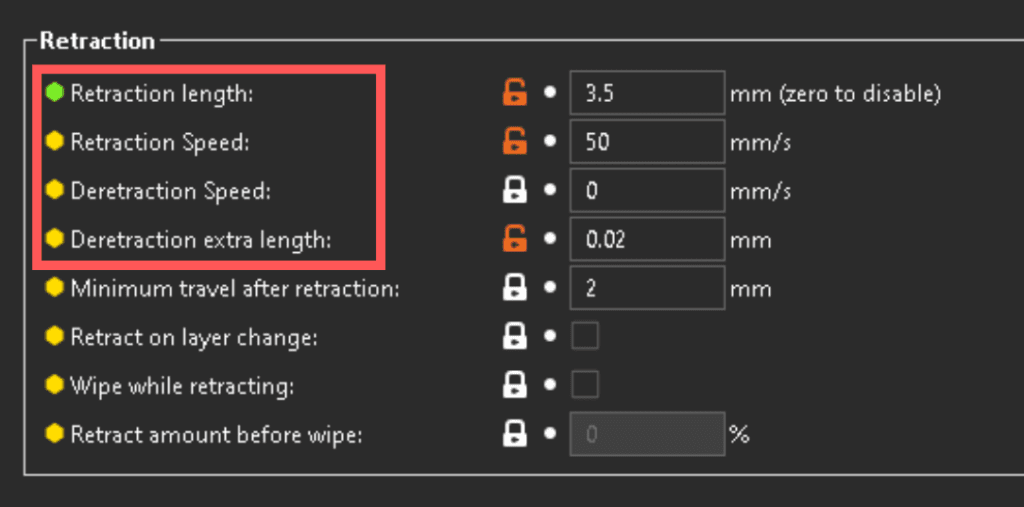
By tuning (Increasing retraction speed and distance) you can reduce or eliminate 3D printing stringing and Fix filament oozing. This fix works better on printers with direct drive extruders more so than with printers with Bowden-style extruders. Due to the fact that Bowden-style extruders have some slack in filaments.
Lower Printing Temperature
Stringing and oozing can also happen when you’re printing with a higher filament than what you should be using for the filament you’re using. Not even adjusting retraction settings can help if you’re using way too much heat.

Layer Shifting
Problem:
Your print has noticeable shifts in layers, leading to misaligned parts.
How to fix it:
- Check Belt Tension
- Secure the Frame
- Slow Down Printing Speed
Check Belt Tension
If you see that the belts have some slack when you apply a little tension on them you will have to tighten them a bit so they will not be loose. Be mindful not to tension them too much to the point where the stepper motors are struggling to move them. That will cause the motor drivers to draw more current and fry themselves.
Secure the Frame
Check the frame to see if all the nuts and bolts are tight. While you’re at it check for the squareness of the frame. Even though the squareness of the frame doesn’t have much of an effect on the layer shifting in 3D prints checking it now will reduce headaches further down in line for you. Every frame member must be bolted tight in order to get better prints.
Slow Down Printing Speed
Layer Shifts can occur if you’re printing too fast. When your print speeds are high the hot and assembly will have more inertia than when you’re printing slowly. Due to that increased inertia, the nozzle will overshoot the position and cause layer shifts.
If the frame isn’t rigid, this inertia could also cause vibrations when doing rapid movements or direction changes and cause layer shifts. This inertia can also make the stepper motors skip steps and cause layer shifts.
Over-Extrusion
Problem:
Too much filament is being extruded, causing blobs and rough surfaces.
How to fix it:
- Calibrate E-steps
- Reduce Printing Temperature
- Reduce Extrusion Multiplier
Calibrate E-steps
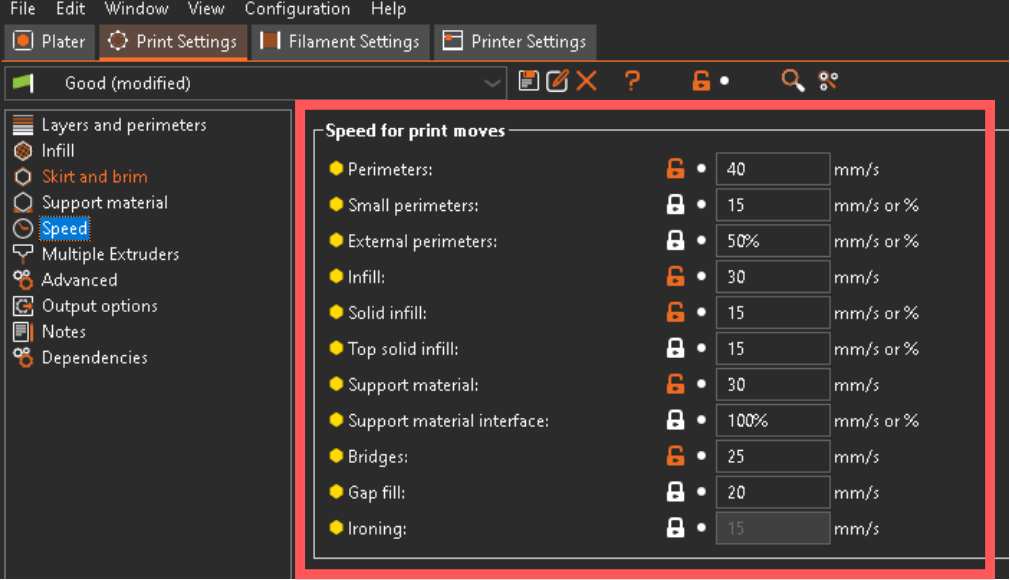
Over-extrusion in 3D printing is directly related to uncalibrated E-steps. Extruder steps must be calibrated properly for the controller to feed the proper amount of filament to the hot end. If the E-steps value is higher than it needs to be the printer will over-extrude. Or even jam the extruder motor if the value is way too high.
Reduce Extrusion Multiplier
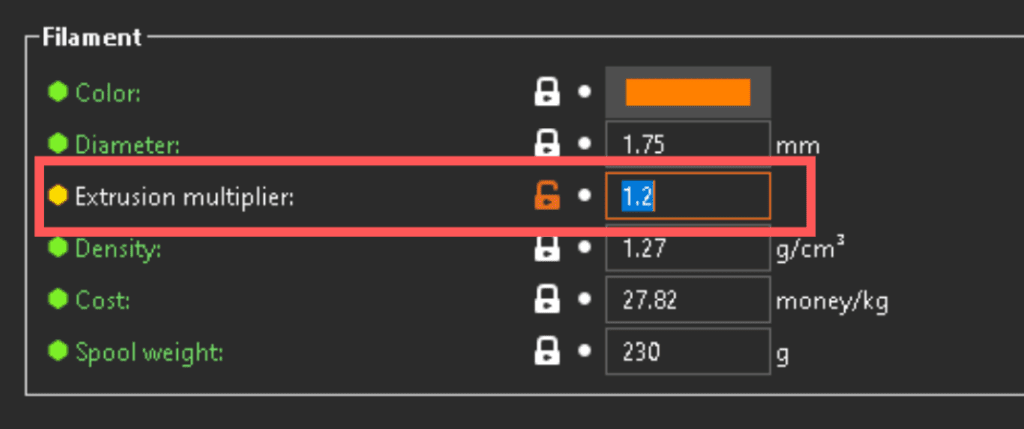
Another factor that affects over-extrusion in 3D printing is having the wrong extrusion multiplier value. The extrusion multiplier can be set in the slicer software. If everything in your printer is set up properly, then this value should be at “1” but you can reduce this number if you have extrusion problems.
In this picture, I’m using a “1.2X” extrusion multiplier because I’m using homemade filament but if you use store-bought filament this should be at “1X”.
You can check out the article about homemade filament maker or pullstruder here.
Reduce Printing Temperature
If the hot-end temperature is too high, the filament will ooze out of the nozzle. This will make the layer width inconsistent.
Under-Extrusion
Problem:
Too much filament is being extruded, causing blobs and rough surfaces.
How to fix it:
- Clean the Nozzle
- Check Filament Diameter
- Increase Extrusion Multiplier
Clean the Nozzle
Try cleaning your nozzle. It might be obvious but, it’s the little things sometimes that get you.
Check Filament Diameter
If you buy a no-name-brand filament, try checking the filament diameter at different points to see if the filament diameter is consistent. Off-brand filaments have quality control issues. This causes the filament diameter to be inconsistent which will cause under and over extrusion.
Increase Extrusion Multiplier
Increasing the extrusion multiplier will for sure remedy under-extrusion problems. But be sure to not increase this value too much, If you do it will jam the extruder.

Filament Jams
Problem:
The filament gets stuck in the extruder, stopping the print.
How to fix it:
- Clean the Nozzle
- Check Filament Quality
- Ensure Proper Cooling
Clean the Nozzle
One of the biggest culprits of filament jams is clogged nozzles. There’s a high chance of filament jams when you have a clogged nozzle, clean the nozzle regularly to avoid jams and increase the print quality.
Check Filament Quality
Cheap filaments with bad quality control tend to cause filament jams. The reasons for this is due to Inconsistent Diameter, Moisture Absorption, Inconsistent Material Composition, Low-Grade Additives, and Poor quality control.
Ensure Proper hot-end Cooling
If your hot-end is not cooled properly, the heat will creep up the hot-end and the filament will melt before it reaches the nozzle. Which will cause filament jams. Dual metal heat breaks (bi-metal)heat breaks will also help with reducing heat creep.
Layer Separation (Delamination)
Problem:
Layers are not bonding well, causing the print to split apart.
How to fix it:
- Increase Printing Temperature
- Reduce Print Speed
- Improve Cooling
Increase Printing Temperature
Increasing the hot end temperature will make the layers bond more effectively. If your hot-end temperature is not enough, the layer adhesion will be poor.

Reduce Print Speed
If your print speeds are too high the layers will not have enough time to bond together, you can experiment with reducing print speeds to fix layer separation issues.

Improve Cooling
Make sure cooling is balanced. Not too strong or not too weak. If there’s too much cooling, the layers will not bond well. The filament coming out of the nozzle will cool even before being laid on top of the previous layer. Which will cause layer separation. If the cooling is too weak, stringing will appear in your prints.
Ghosting (Ringing)
Problem:
Echoes of features are visible on the print, causing a rippled effect.
How to fix it:
- Tighten Belts
- Slow Down Print Speed
- Use Damping Feet
Tighten Belts
Tension all the belts properly. Not too tight not too loose. Poorly tensioned belts will cause vibrations which will lead to ghosting in your prints.
Slow Down Print Speed
Slowing down the print speed will reduce the chances of ghosting. Because the vibrations decrease when you slow down your prints.
Use Damping Feet
Adding rubber-damping feet or pads can reduce the vibrations and reduce ringing in your 3d Prints.
Elephant’s Foot
Problem:
The bottom layer of your print is slightly larger than the rest, causing it to bulge outward.
How to fix it:
- Lower Bed Temperature
- Adjust Initial Layer Height
- Use a Brim
Lower Bed Temperature
Lowering the bed temperature incrementally till you see the elephant’s foot disappear. If you lower it past 15-20°C past the recommended value for the filament that you’re using. Then the issue is likely to lie somewhere else.
Use a Brim
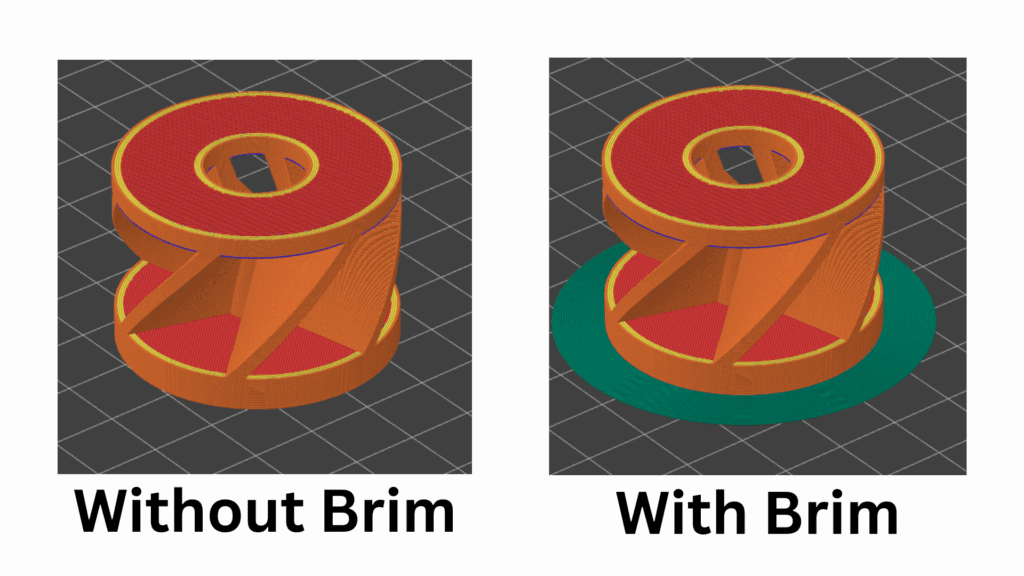
Adding a brim to your prints will help evenly distribute the filament pressure and reduce the chances of elephant’s foot.
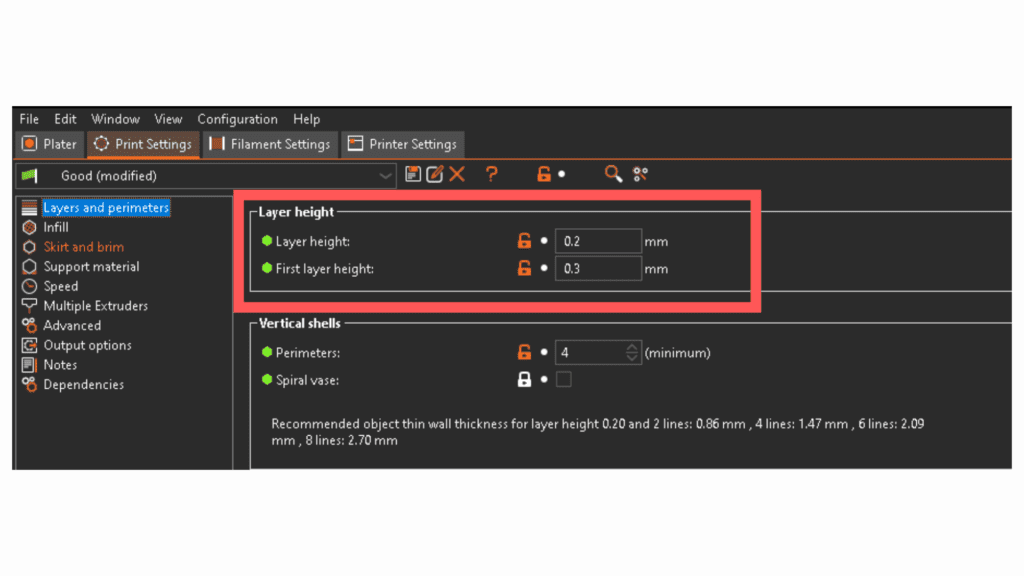
Adjust Initial Layer Height
Try increasing the initial layer height.
Warping
Problem:
The edges of your print curl up, distorting the final product.
How to fix it:
- Increase Bed Temperature
- Use a Heated Enclosure
- Apply Adhesives (brim and raft)
Increase Bed Temperature
Raise the bed temperature to prevent the first layers from cooling too fast, losing adhesion, and curling up.

Use a Heated Enclosure
Using a printer with a heated enclosure will help to maintain an even temperature and reduce warping.
Apply Adhesives (brim and raft)

Using features like brim and raft to increase the surface area of the first layer will help to keep the edges of the print flat against the bed. Adhesives like hair spray or glue sticks will also help with this.

One Response